Snap Tray
Crochet a pretty tray.
It lays flat for storing or washing and easily
snaps into a tray.
It could also double as a coaster or place mat or
a party favor cup.
It doesn’t get much easier than this.
All you need to do is make a square or a triangle.
I used the single crochet stitch with different
edgings.
It’s great for keys, coins, candy, and hooks …
whatever…
There is no real story behind this one.
I am just always looking for a tray or box for little things.
And the idea just materialized.
There is no real story behind this one.
I am just always looking for a tray or box for little things.
And the idea just materialized.
Pattern Notes:
This is more like a guideline, than a pattern.
You can make it any size you want.
It
can be made larger or smaller….
Just
by increasing or decreasing the beginning number of chains.
I think you could use just about any type of yarn
or thread or hook.
I used cotton because it is soft and easy to wash.
I used a smaller hook than required for the yarn
to make it a bit tighter and snug.
Different types of
stitches or motifs could also be used.
The patterns below are just suggestions.
They are very easy, but you could also make
elaborate ones, if you so desired.
If you use the back-ridge-bump on the first row:
The two free loops of each stitch make it easier to
stitch around for an edging,
And no big gaps.
The edging could be a different color.
Appliques could be added on the inside bottom or on
the outer sides.
Abbreviations:
Beg
= Beginning
BLO = Back Loop Only
Ch(s) = Chain(s)
FO =
Fasten Off
Sc =
Single Crochet
Sk = Skip
Ss = Slip
Stitch
St(s) = Stitch(es)
YO =
Yarn over
US Terminology
Materials:
4 mm / F hook
Lily Sugar and Cream Cotton worsted weight Various
colors
4
Snaps (I used size 1/0)
OR
No Snag Velcro
Sewing
Needle to sew snaps
Sewing
thread (Invisible Thread or the color of the yarn or the snaps)
Gauge:
4 sc and 4 Rnds =
~ 1” Not crucial.
Size: measured flat:
Purple Large Square = 6 ¼ x 6 ¼
Orange Medium Rectangle = 5 x 8
Red Square = 5 ¼
**********
Row 1: Ch 25, Sc in back-ridge-bump
of the 2nd ch and across. (24)
Rows 2-24: Ch 1, Turn. Sc
across. (24)
Edging Row 25: Ch 1, Turn. Sc
completely around with 3 sc’s in each corner. FO.
Orange Variegated Rectangle:
Row 1: Ch 21, Sc in back-ridge-bump
of the 2nd ch and across. (20)
Rows 2-31: Ch 1, Turn. Sc
across. (24)
Edging Row 32: DO NOT TURN. Reverse-Sc
around.
Ch 1, insert
hook in last sc. YO, pull up a loop, YO
and pull through both loops.
Work from Left to Right single crocheting completely.
FO.
Red Tray with back loop stitches on the crease lines:
Row 1: Ch 12, Sc in back-ridge-bump
of the 2nd ch and across. (11)
Rows 2-12: Ch 1, Turn. Sc
across. (24)
Row 13: Ch 1, Turn. 3 Sc in
first st (corner), *Sc in next 9 sts, 3 Sc in next st.
Turn work
90 degrees and work 11 Sc down the side. *
3 Sc in next corner.
Repeat from * to * once and join with a ss to the
1st st.
Row 14: Work this row in BLO. Ch 1, Sc around with 3 Sc’s in each corner st. Join.
Rows 15- 16: Ch 1, Continue to Sc around with 3 Sc’s in each corner st. Join.
Edging Row 17: Ch 1, Sc in same
st. (Ch 3, Sk 1 st, Sc in next st)
around to the last st.
Ch 3, ss in same as
first sc. FO and weave in.
Finish:
Fold a corner point. Measure and
mark where you want to place the snap.
I put mine about 1½ inches (3.8 cm) from each side on the row below
the edging row.
Sew each segment of the snap equal distance on both sides from the
corner point.
After snapping all four corners closed…
You can press and squeeze the bottom edges to
help it hold its shape.
If you prefer, you can sew or permanent-glue no-snag Velcro.
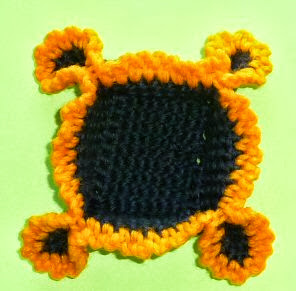
Black and Orange Tray (Basic idea):
The Black and Orange party favor was stitched
closed at the corners.
It does not unsnap or fold flat, but was fast
to make.
For this
one, I used Caron Simply Soft Yarn.
I
employed a Tunisian Simple Stitch for
the bottom.
Any number of stitches you decide.
I used 10 stitches for this one.
I then used Single Crochet
around the side edges.
I
added an orange trim edge (Sc, Ch 2 in
each st).
And
I joined the corners in the 5th stitch from the center corner sc on
each side.
Insert the hook in the 5th stitch after the corner stitch, and then
inserting it into the 5th stitch before the corner stitch (previously stitched with edging), YO and
pull through both stitches, YO and pull through both loops to complete the Sc.
Note: The 5th
stitch worked well for the height of the sides of this one.
You can use any stitch that you decide best for
the corner.
Have fun and enjoy!


